Paris/PROTOCOLS
From 2007.igem.org
For newcomers in wetlab: see also the course by D. Endy Laboratory Fundamentals of Biological Engineering.
Contents |
Getting started
This topic is adressed to all our informatics-physics-I'm-afraid-of-the-bench fellows. So, if you finally found the courage to dare the pipettes, PCRs and nicely smelling bacteria, welcome!
- What a pipette is?

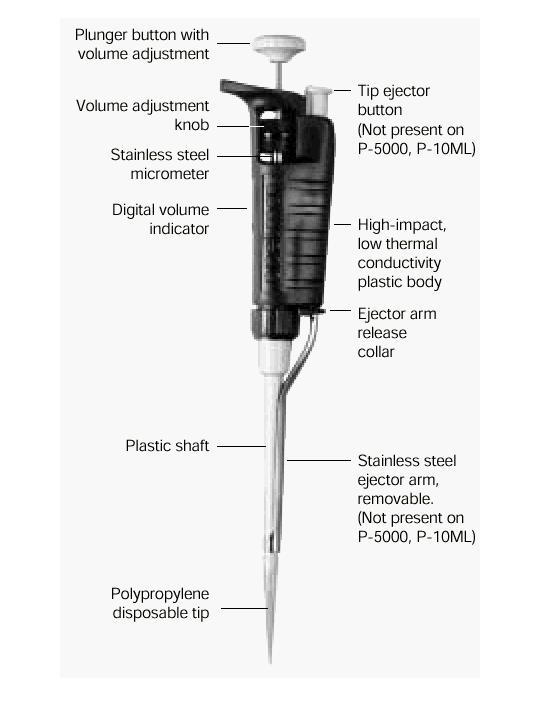
Pipettes dispense various volumes. The plunger button indicates the maximum volume (microliters) that the pipette is designed to handle. For example, P-20 will handle up to 20 microliters.
The digital volume indicator is read from top to bottom. For P-2, P-10, P-20, P-100, and P-200, black digits indicate microliters and red digits tenths and hundredths of microliters. For P-1000, red digits indicate milliliters and black digits microliters.
What to do when you have it in you hand?
-Hold the pipette in one hand (it doesn't bite...). With the other hand, turn the volume adjustment knob counterclockwise so the volume indicator is 1/3 revolution above the desired setting, then slowly turn clockwise until the indicator shows the desired volume.
-Attach a new disposable tip to the pipette shaft.
-Press the plunger to the FIRST stop. This part of the stroke is the volume displayed by the indicator.
-Holding the pipette vertically, immerse the tip a few millimeters into the sample.
-Allow the pushbutton to return slowly to the UP position. Avoid to blurt out the plunger button abruptly : there are bulls appearing and your volume is false...
-Ensure that the full volume of sample was properly drawn into the tip.
-Withdraw the tip from the sample.
-To dispense the liquid, gently touch the tip to the side of the receiving vessel, immersing the tip into liquid within the vessel. Press the plunger to the SECOND stop.
-With the plunger fully pressed, withdraw the tip carefully, wiping residual drops against the vessel wall.
-Allow plunger to return to the UP position.
-Discard the tip by depressing the tip ejector button.
Note down that different tips exist : ensure that you have the right one (labels will indicate you the size, etc.). It's better to use filter tips.
To train, you can simply pipette water : it's important to know how much 1 µl is...
To be continued...
- Growing bacteria in liquid medium
-Light the Bunsen burner. It permits you to keep a 10 cm perimeter sterile et thus not to contaminate your future colonies.
-Get a 50mL Falcon tube and put into 5 mL of LB medium. Add supplementary stuff if needed (antibiotics, metabolites, etc.).
-Pick up a sterile toothpick. Use it to gather a single colony of cells (you know, a white point on your Petri dish...).
-Place the toothpick with the colony into the solution.
-Incubate overnight at 37°C with shaking (at about 200 rpm).
Next morning, after a cup of coffee and a croissant, you can check up  .
.
<<home
Strains
Here you can find the list of strains we have.
E. Coli MG1655
WT
E. Coli w121
We got the w121 strain from a lab in Pasteur Institute. This strain is [DapA-; Erythromycin R], but also has a couple of other mutations we are not interested in.
E. Coli Ftsz -TS84
Three clones are available : 121.1, 121.2, 121.3. More details soon
Acinetobacter
Transduction with P1 bacteriophage
Preparation of the P1 stock on the w121 strain.
Step of Tuesday, July 3
To be completed...
Transduction to MG1655 using the P1 stock made on w121.
Step of Wednesday, July 4
To be completed...
Titration of bacteriophages
- Take your stock of bacteriophage
- make several dilution of your stock, for example :
- 10µL of stock in 990µL MgSO4 0.1M -> d2
- 10µL of former solution in 990µL MgSO4 0.1M ->d4
- 10µL of former solution in 990µL MgSO4 0.1M ->d6
- 10µL of former solution in 990µL MgSO4 0.1M ->d8
- In a petri dish containing LB, spread a solution of 100µL of E. Coli MG1655 in stationnary phase + warm top agar 900µL (TA,7)
- Spread this mix over a petri dish
- add droplets (7µL) of your phages dilution on the petri dish, mark the places where you put these droplets
- Incubate ON at 37°C
- check for lyse plaque
Preparation of DAP solution from the powder (50mM)
Step of Friday, July 6
- M(DAP)=190.2g/mol
- I put 0.285g of DAP in 30ml water
- Aliquoted by 15ml
- Stored in the freezer at -20°C
- the stock is 166x
Preparing growth media
Making 10 petri dish (LB+tet+citrate+DAP)
- take 250ml of LB
- warm it up in the microwave for ~ 6min
- wait until you can handle the bottle for 2sec
- add 5ml of citrate 1M
- add 1.5ml of DAP
- add 250µL of tetracycline (stored in freezer at 1000x)
- spread the medium in about 10 petri dish
Making 10 petri dish (LB+erythromycin+citrate+DAP)
- take 250ml of LB
- warm it up in the microwave for ~ 6min
- wait until you can handle the bottle for 2sec
- add 5ml of citrate 1M
- add 1.5ml of DAP
- add 1.9mL of erythromycin (stored in the freezer at 133x)
- spread the medium in about 10 petri dish
Fluorescent single cells visualisation
Slide preparation
- Make LB-agarose : 0.15g of agarose in 10ml LB
- warm it up in the microwave (a lot!!, to avoid cristal of agarose that could remain in the gel => ugly over microscope)
- wash the slide (special slide with "two holes" with ethanol)
- put ~80µL of LB-agarose in each hole
- spread the gel with another slide and wait for ~2 min
- remove extra gel with a cutter
- put a droplet on the gel:
- if you have a solid culture:
- - pick up some colonies
- - suspend within 100µL liquid medium (M9)
- - put 1-2 µL on the gel
- if you have an avernight liquid culture:
- - take 1mL of the culture
- - centrifugate 1000 rpm 1 min
- - resuspend into 150 µL of medium (M9)
- - put 1-2 µL on the gel slide
- spread it by moving the slide
- wait until you don't see the droplet anymore (2min)
- put a coverslip and attach it with nailpolish
- optionally : you can put wax around
Turning on the microscope
- turn on : the light, the microscope, the shutter, the joystick
- launch Metamorph
- turn up the condenser and the objectives in load position
- !! take care : not keeping the light on if we doesn't use it
- !! do not switch on short after
- wait 5 min (the microscope is checking the ranges of movement
Visualisation
Preparation
- put a droplet of immersion oil on your slide, and attach it on the slide
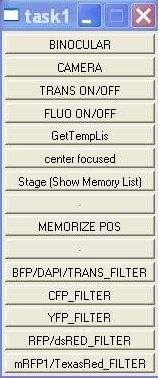
- Journal >> Show task bar
- Task bar
- >> Trans ON/OFF: turn on the halogen lamp
- >> Binocular/Camera: turn on the binocular or the camera
- >> Choose the fiter
- Move up the objective until oil touches the slides
- Turn on the binocular with trans filter
- Move up the stage with micrometric "screw" until you see your cells, or something moving
- Acquire:
- - Digitizer (10MHz!!)
- - Image >> New !!! ( without this, each image you take will overwrite)
- - Settings >> (trans ou fluo; choice of exposure time)
- Turn on the camera (Task bar >> Camera)
Trans Image
- Turn trans light on (Task bar >> Trans ON) and trans filter
- Acquire >> 100ms trans
- Acquire >> Show Live
- Acquire >> Acquire: acquire the trans image
Fluo image
- Task bar >> fluo filter; trans OFFOFF)
- Acquire >> 1s fluo
- Acquire >> Acquire: acquire the fluo image
- Acquire your images, etc, have fun
- save your images in E:\iGEM\YYYY-MM-DD\a_proper_name
Turning off the microscope
- Turn off the software, the microscope and the differents machines
NB : Nile Red, choose mRFP1/TexasRed filter <<home
