Davidson Missouri W/Web tool
From 2007.igem.org
Contents |
Introduction
The gene-flipping mechanism that powers our computer requires the positioning of hixC sites within reporter genes' coding sequences. Through the use of PCR, a gene can be split into two pieces with BioBrick ends attached at the extremities. This allows for the ligation with a hixC site in the middle. Our team has developed a web-based tool to automate the generation of these PCR primers. It also predicts the resultant DNA sequences for the two intermediary parts, the final part, and the resultant polypeptide. By using this program we hope to make the gene-splitting process faster and to remove the potential for human error. The tool can be accessed at [http://gcat.davidson.edu/iGEM07/genesplitter.html http://gcat.davidson.edu/iGEM07/genesplitter.html].
(back to Software)
Tutorial
What follows here is an explanation of how to use the web tool and what it does.
The First Page
The initial page begins with an overview of what the tool does and how to use it. There are 3 inputs required from the user:
- The DNA sequence for the gene to split.
- The amino acid number where the insertion is desired. The hixC site will be inserted immediately after the given amino acid.
- The choice for an extra nucleotide. Inserting a hixC site amounts to an addition of 38 bases. Unless a 39th base is added, a frameshift will occur since 38 is not a multiple of 3. The nucleotide choice results in either a glutamate or aspartate.
Once the user has entered this information, he or she can then click the 'submit' button to initiate the calculations.
The Output
After the user has submitted the information, a new page opens. Before any calculations are done, some information is provided to allow the user to verify that the tool is analyzing the correct sequence. The first output is the original sequence. This should be identical to the sequence provided by the user. The next two sequences show the DNA sequences that lie before and after the insertion point. The tool then restates the insertion point and the extra base.
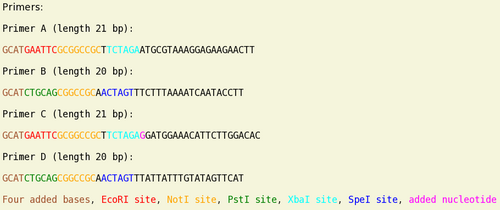
The first calculations are the 4 primers for the two PCR reactions. The display is color-coded so that the restriction enzyme sites in the BioBrick ends are easily distinguishable. After the BioBrick ends, between 20 and 25 bases should follow. These bases should function as PCR primers to the given gene. Their length is optimized to match melting temperatures as much as possible. This is done using Proligo's formula from their [http://proligo2.proligo.com/Calculation/calculation.html website]. Note that they use two formulas: a simple one for sequences of size less than 20, and a more complicated one for larger sequences. Below the primer sequences are their computed melting temperatures and GC content, as well as their lengths (excluding BioBrick ends).
Once the primers have been displayed, the tool provides some additional useful information. The two intermediate parts, with BioBrick ends, are shown. This is useful if it is necessary to verify the PCR results by sequencing. The DNA sequences for the scars and the hixC site are provided, as well as which amino acids these will produce (along with the user-inputted 39th base). The final product is then displayed, with the inserted hixC site and BioBrick ends at the extremities. Also shown are what becomes translated (the final product without the BioBrick ends), and the translation itself.
The software checks the parts to ensure that there are no restriction enzyme sites in them. It also checks for the presence of the DNA sequence which causes the methylation of XbaI sites.
How the Primers Work
We use these DNA sequences as PCR primers to split our genes. There are a total of 4 primers to use: there are two gene portions, before and after the split, and each portion needs a forward and a reverse primer. These primers are denoted A, B, C, and D. Note that it is critical to have a 39th base in order to avoid a frameshift. Also note that if this base is as T, and followed by a C, the sequence is sensitive to methylation by DAM.
- Primer A is the forward primer for the first portion
- Primer B is the reverse primer for the first portion
- Primer C is the forward primer for the second portion
- Primer D is the reverse primer for the second portion
If the user wants an insertion in a DNA sequence:
Then the primers and inserted sequences will be as follows:
Melting Point Calculations
Melting-point temperatures for DNA strands are calculated using the following algorithm:
If the length of the strand is 20 or less:
Return 4*(# Gs + # Cs) + 2*(# As + # Ts).
Otherwise:
Compute sigma_dH and sigma_dS based on enthalpy and entropy values for base-pairs. Return (-1000 * sigma_dH / (-10.8 - sigma_dS + 1.987 * -23.5) - 273.15 + 16.6 * -1.3).
Future Features
Some other things we might want the gene-splitting tool to do.
Displaying the Split in 3-D
If the user uploads a PDB file, color the 3D structure to highlight the two fractions on the protein: the one before the split and the one after the split.
Finding More Genes to Split
Creating larger graphs requires using more nodes. Perhaps it would be convenient to have the tool find genes to split, and where to split them, based on some initial criteria.


