Imperial/Wet Lab/Protocols/ID2.1
From 2007.igem.org

Wet Lab: Protocols: Preliminary AHL Testing
Aims:
- To make a rough estimate of the sensitivity of the system to a large range of AHL concentrations
- To determine approximations of the threshold of response, time of response, life span and rate of GFP produced
Day 1
Equipment
- Eppendorf Tubes
- Gilson pipettes p1000, p200, p20, p10
Reagents
- AHL stock solution of 1mM
- Nuclease free water
Protocols
- Prepare AHL serial dilutions for experiment, to make up a total of 100nM, 50nM and 10nM
- Using stock solution of 1mM of AHL, carry out the following dilutions using nuclease free water:
- Add 2.1ul of AHL to 997.9ul of water in an eppendorf tube, making up solution A.
- Remove 10ul from solution A into another eppendorf tube and add another 10ul of water, making up solution B.
- Remove 1ul of solution A into the third eppendorf tube and add 9ul of water to it, making up solution C.
Day 2
Equipments
- Fluorometer + PC
- Water bath in cold room at 10°C/15°C/20°C
- 25°C water bath
- 1 Fluorometer plate (black)
- Sticky seal tape
- Gilson pipettes p200 p20 p10
- Eppendorf Tubes
- Stopwatch
Reagents
- Commercial S30 E.coli extract. Including:
- 175µl Amino Acid Mixture Minus Cysteine, 1mM
- 175µl Amino Acid Mixture Minus Methionine, 1mM
- 175µl Amino Acid Mixture Minus Leucine, 1mM
- 450µl S30 Extract, Circular (3 × 150µl)
- 750µl S30 Premix Without Amino Acids
- Nuclease Free water
- AHL solutions A B C
- DNA pTet-LuxR-pLux-GFP from midiprep
Protocols
- First collect all equipment and reagents and ensure that the fluorometer and that the PC connected has a data collection protocol installed.
- Place the 96 well plates together with their plate mates in their respective incubators so as to heat them up to the appropriate temperature before the experiments start.
- For the next step of the go to the biochemistry level 5 and remove:
- A.A's from kits
- Premix tubes (140ul)
- S30 tubes (105ul)
- For each AHL concentration Tested Prepare the following
- Commercial E.coli Cell Extract: First prepare a complete amino acid mixture for both extract solutions: Add the 17.5μl volume of two amino acid minus mixtures into an labeled eppendorf to give a volume of 35μl. Each amino acid minus mixture is missing one type of amino acid, and so by combining two solutions we are complementing each solution for the missing amino acid. Place eppendorf in a rack on bench.
- Commercial E.coli Cell Extract:Add all of the E.coli complete amino acid mixture to S30 Premix Without Amino Acid and 45µl of S30 Extract Circular. Place the eppendorf tube in a rack on the bench.
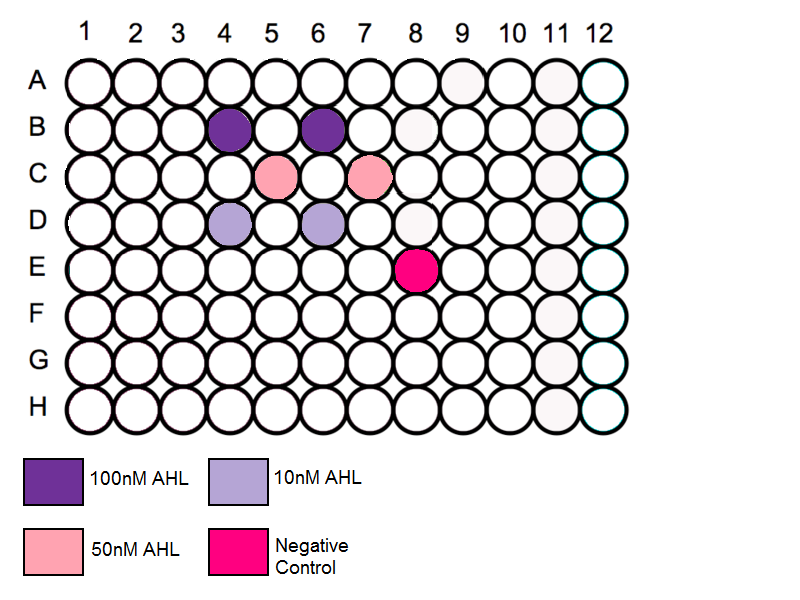
- Vortex the tubes to mix thoroughly and place 40ul into each well-B4, B6, C5, C7, D2, D4, and E8.
- Place 20ul of midipreped DNA plasmid into each of the filled wells.
- Any left over premix or cell extract should be returned to the freezer in biochemistry level 5 and labeled with new volumes.
Schematic
- Throughout our series of experiments we are reusing the 96 well plates. It is important to measure each plate before the schematic is determined, this is to prevent any contamination.
- Using the protocol above using wells near the edge should be avoided and the wells spread out throughout the plate
- Add 3ul of solution A to two wells B4 and B6. [AHL]=100nM
- Add 3ul of solution B to two wells C5 and C7. [AHL]=50nM
- Add 3ul of solution C to two wells D2 and D4. [AHL]=10nM
- Add 3ul of nuclease free water to well E8. [AHL]=0nM
Loading Plate
- Follow the schematic for the plate and begin by loading the in vitro expression system into the correct wells. Before loading in the samples vortex the tubes for a few seconds to mix the solution.
- Tap down the top of the lid to bring down any solution to bottom of the well.
- Remove lid off the 96 well plate and place in the fluorometer. Create a file name insert temp under: D:\IGEM\INSERT DATE\ID\ 25oC. Export the data here. Each file should be named as the following:
- construct-temp-time-date
- This measurement will give a back ground fluorescence measurement and can be used as our time zero data.
- Then to begin the reaction add 20μl of purified DNA sample to each well indicated on the schematic. Be careful not to add to wells that DO NOT NEED DNA.
- Place the plate in the fluorometer to measure its initial fluorescent reading.
- After the measurement, place the sticky tape across the plate, and put the plate in the 25oC water bath.
- Before placing them in the water bath, wrap aluminium foil around them to prevent photobleaching.
- repeat this every 30 minutes for 6 hours.
|
